iMessage is a handy messaging app for iPhone and Mac users for sending/receiving SMS-type text messages and MMS-type multimedia messages. The catch here is that iMessages can be sent using a Wi-Fi connection rather than consuming your cellular data. However, before you can be able to take advantage of iMessage app, you have to activate it and set it up on your device be it an iPhone/iPad or Mac. If you are not yet familiar with how to activate iMessage, there is a different method used for iPhone/iPad and Mac. Both of them are described here in full detail. Let’s take a look.
Jump To Section:
How To Activate iMessage On iPhone
If you are activating iMessage on your iPhone, here are the steps that you will have to follow.
-
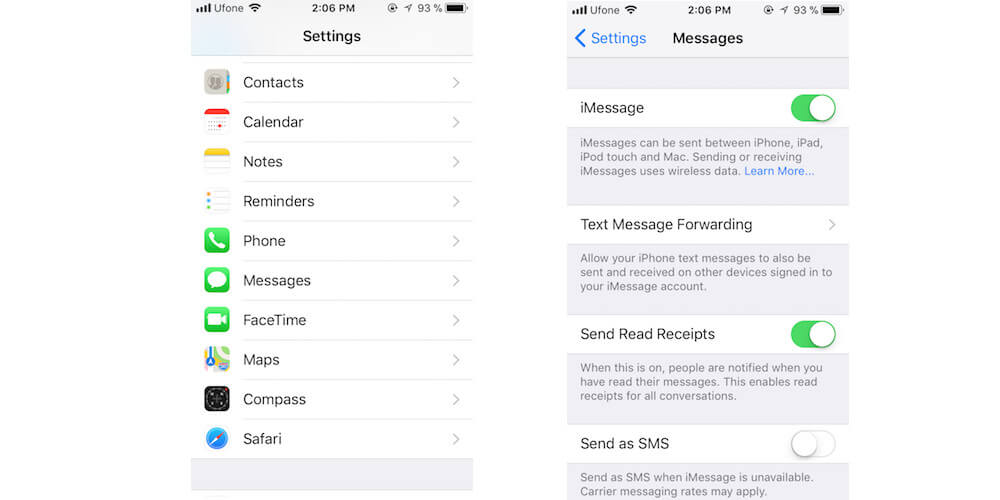
- Launch Settings app on your device from the Home Screen
- Scroll down in settings menu and tap on Messages
- There will be a white slider in front of iMessages that you have to turn on by sliding. It will turn to green color to indicate that you have enabled iMessages. You will now be allowed to send/receive messages without having to consume your cellular data whenever you are connected to Wi-Fi connection. Text messages can still be sent without wireless connection with the help of cellular data.
- Here, if the setup prompts you to login using your Apple Login credentials, just input the details and login. The login details provided will be verified by the app and iMessage activation will be successful. If you’re not using an Apple ID already, create one now.
- It may take around 24 hours for iMessage to activate as Apple verifies and matches your phone number with Apple ID. But, normally, it doesn’t take more than an hour for activation.
- Now, tap on Send & Receive. You will be taken to iMessage settings where you can specify which phone number and emails you can send/receive messages to and from.
- Just tap the desired email/phone number for enabling it. You will be able to see a check in front of that account right away. The checked email/phone number can now be able to send/receive messages through iMessage.
- In section labeled ‘You can be reached by iMessage at’ you can add/remove and also select emails where you want to receive the iMessages. Phone number can also be specified here and in that case the specified number will be used for sending/receiving messages. The list on other devices will show the number only once you have configured it on your iPhone.
- In section labeled ‘Start New Conversation from’, select an address that others will be able to see when an iMessage is sent to them from your device. Your phone’s number can also be used here just like the section above. The list on other devices will show the number only once you have configured it on your iPhone.
So that’s how to activate iMessage on iPhone and set up for use. The process for setting it up on Mac is a bit different and described below.
How To Activate iMessage On Mac
Here are the steps that you will have to follow for activating iMessage on Mac. They’re a bit different, as mentioned earlier, so take a close look.
- Launch Messages app on your Mac. It’s a blue-colored talk bubble that you can find either on the desktop or in the dock.
- Once the app is launched, click Messages from menu bar located on top of the screen
- If this is the first time that you are using Messages app on this machine then you will be asked to provide your Apple login details and if you don’t have an Apple account then you will be asked to create one. Just input the details or click ‘Create Apple ID’ whichever is appropriate.
- If this is the first time that you are using Messages app on this machine then you will be asked to provide your Apple login details and if you don’t have an Apple account then you will be asked to create one. Just input the details or click ‘Create Apple ID’ whichever is appropriate.
- Click Preferences
- Click Accounts icon that appears like white-colored ‘@’ symbol. You can find it in top left side of window
- Click iMessages account from left hand menu
- Input your login details and click on Sign In
- If you’re already logged into your account then this option will not appear on the screen

- If you’re already logged into your account then this option will not appear on the screen
- Click Settings
- Click the checkbox labeled ‘Enable this account’. You’ll see it right below the Apple ID you’re using. This will show check mark on the box to indicate that selected Apple ID can send/receive message from now onwards.
That’s how to activate iMessage on iPhone and Mac. You can use one of the above methods according to the device you want to activate iMessages on. Just make sure you follow the steps as described above. If you have any queries, get in touch through the comments section below.
Check Other Topics:
- A Complete Guide On iMessage – APPLE PIT
- How You Can Share Your Contacts, Location And More Using iMessages On iPhone/iPad?
- Learn iMessage Shortcuts For Speeding Up Chat On iPhone
- How To Block, Mute & Report Spam iMessages On Your iPhone/iPad